Recently in my spare time I worked on a PCB design, something I do occasionally as a fun challenge for myself. The goal of the PCB is to integrate into a popular brand of spa pool to enable wifi connectivity and home automation support.
I was one of a few people involved in the overall project, but the focus of most people is mostly on the software side of things. Other people involved in the project were using a few different hardware solutions (which I discuss below), but they all required some degree of soldering, risk, and purchasing of various components: ESP32 or ESP8266 development boards, along with some bread board or basic soldering to add a few resistors, voltage converters, and RJ-45 ports for connectivity to the spa itself. Unfortunately, there was at least once incidence of a person frying their spa pools controller board due to a bad soldering job on their hand-built controller board.
In the Beginning
In the beginning, people wanted to relax in their spa pools :-) The problem is, many of us are also geeks and want to automate things. Many spa pools have a spanet controller board, (similar to those sold individually here) which is a simple board that controls the pumps, heater, and lights in the spa pool. These boards do not support wifi, and do not have any kind of API or connectivity to allow for remote control or automation. The only way to control the spa pool is to be physically present and press the buttons on the dashboard, or to buy a wifi module, which is quite expensive (see here for example).
Explorations
Fortunately, as geeky people, a community sprung up to explore the possibilities of adding wifi to the spa pool. People realised that the wifi module you can buy plugs into a standard RJ-45 plug on the controller board. They were able to determine that three pairs RJ-45 connector were used: Pins 1/2 for Health Check, Pins 5/6 for serial communication with the controller, and pins 7/8 from Ground/+12v.
At this time, a few different projects began to spring up. One project was to reverse engineer the communication protocol used by the wifi module when talking to the cloud, and another project was to build a new controller board that could be used to control the spa pool. The new controller board would have wifi built in, and would be able to control the spa pool in a similar way to the original controller board. The new controller board would also have an API, so that it could be controlled remotely, and could be integrated with home automation systems over MQTT.
Existing Options
As with most open source projects, there were two projects that sprung up independently to specify controller boards. I'll briefly mention each of them here:
Design One
The first design (and its related software) appeared here. It is the more active of the two projects, and has an active discord group around it. The software was originally designed with ESP32 chips in mind, but recently ESP8266 support has been added.
In terms of hardware, here are a few images of the circuit design and the final board that one person built:
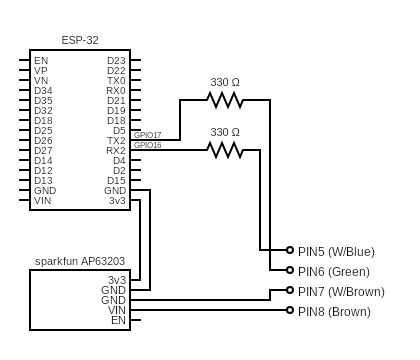
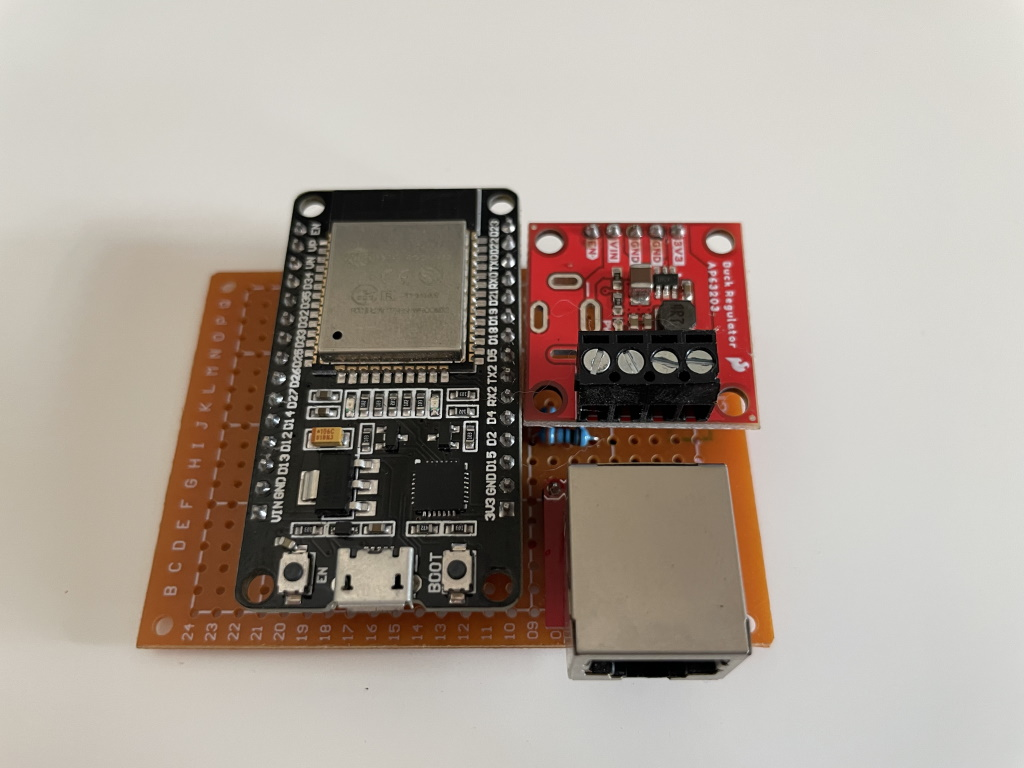
As you can see, it is a relatively trivial exercise to build one, but error prone enough to be a bit scary for people who do not solder often or well.
Design Two
The other design (and its related software) appeared here. This project largely appears to be abandoned these days, but it had one nice feature that the first design lacked - a custom PCB design, along with the recommended components that could then be purchased by people and soldered onto the board. People could download the files from the GitHub repo, and submit them directly to JLCPCB to have the blank board manufactured. Here is an image of the PCB design and the final board that one person built:
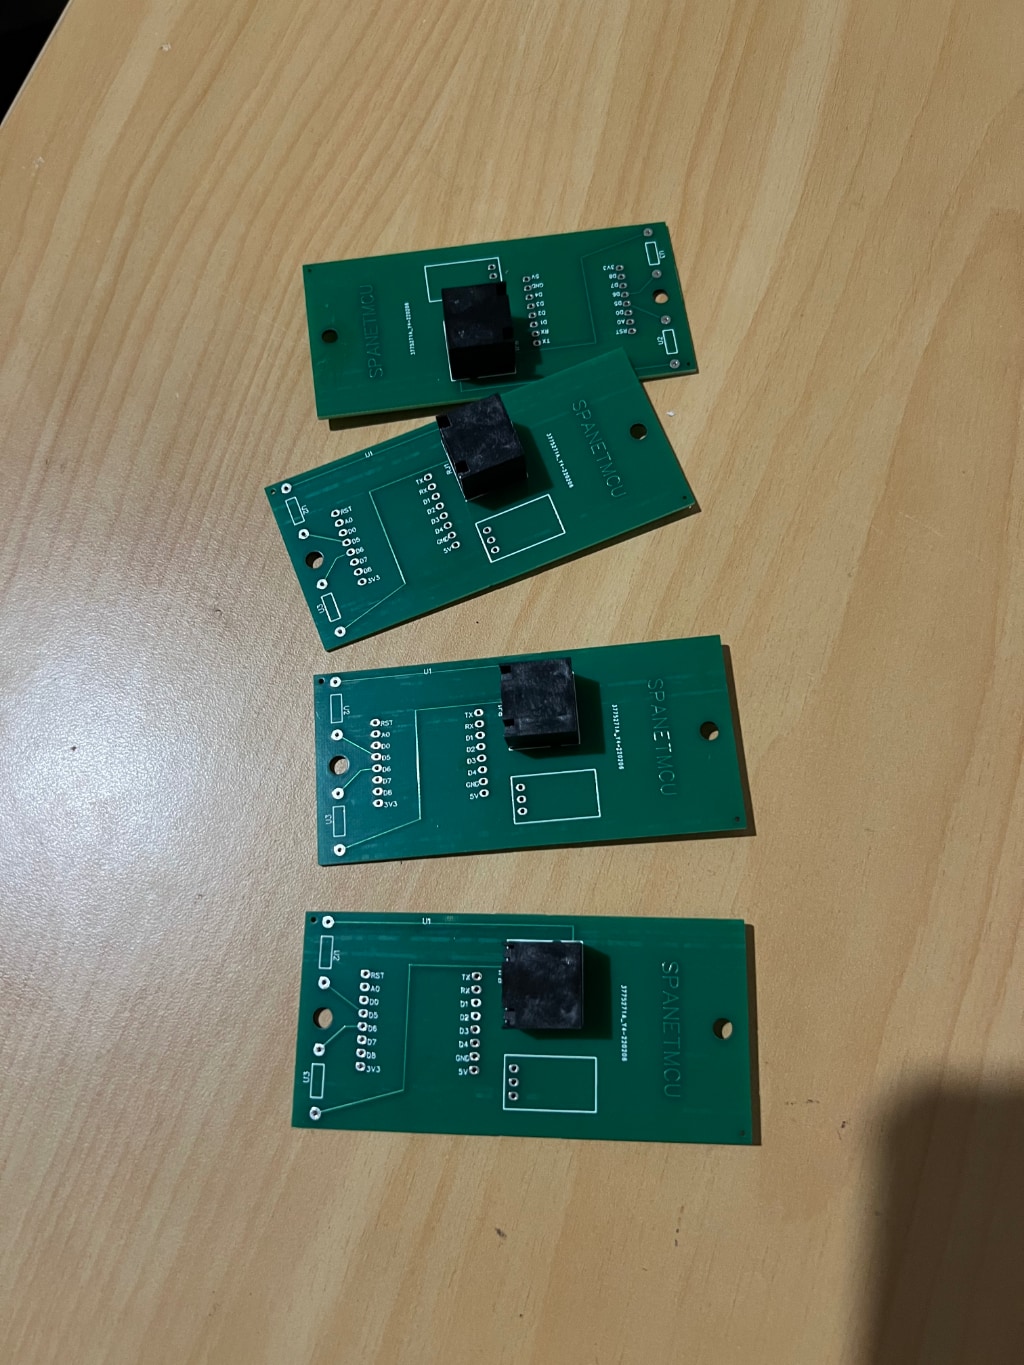
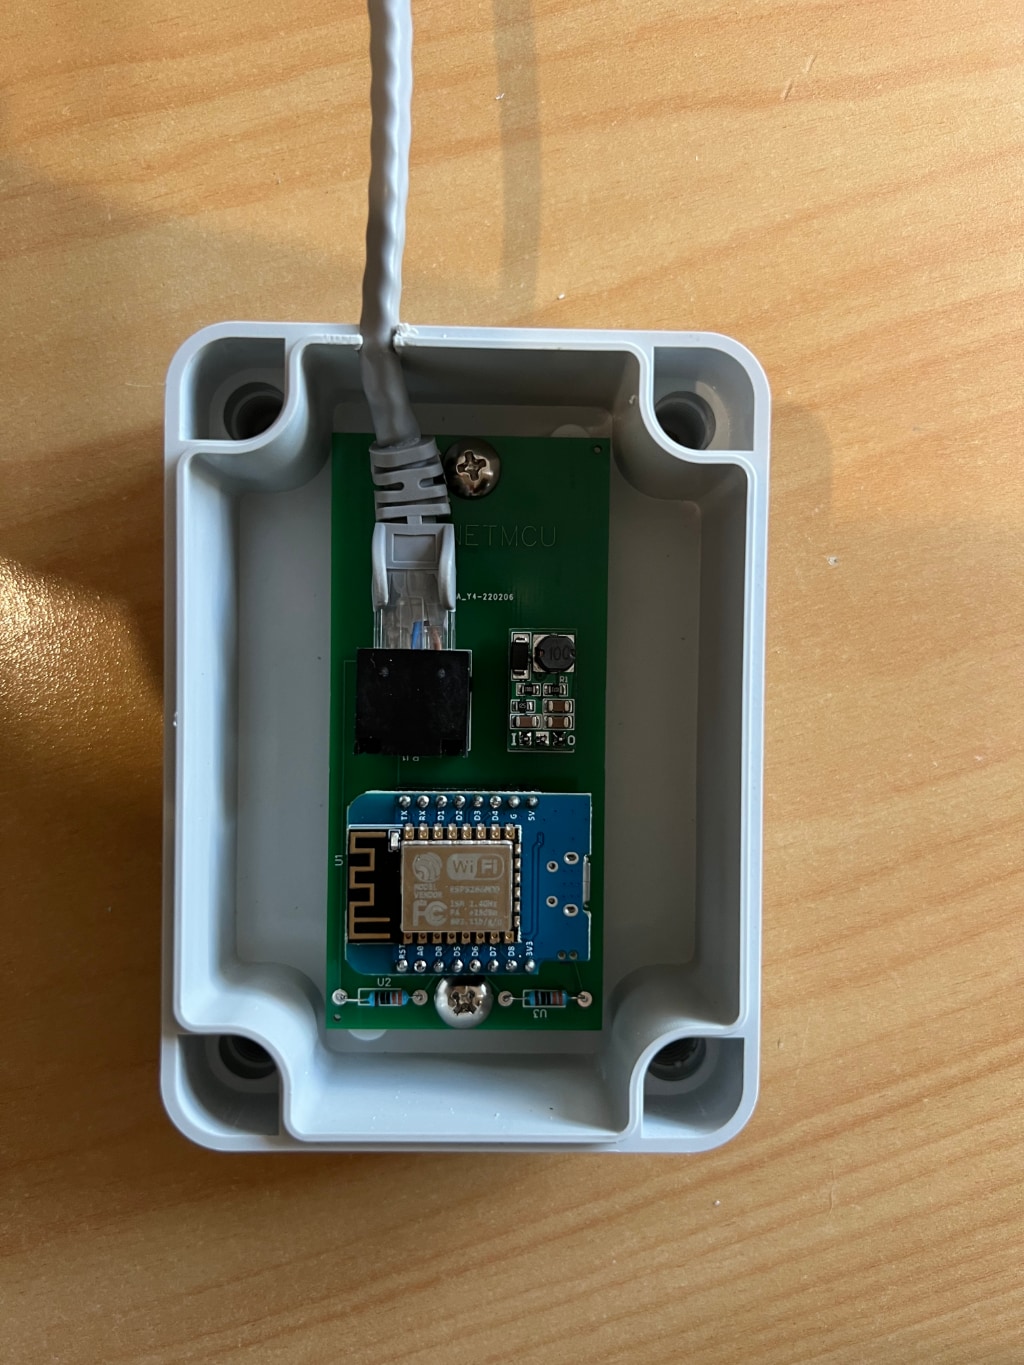
This board (and software) was based around the ESP8266-based Wemos D1 mini dev board.
The New Controller Board
With development picking up on the first project, I decided to take a look at the hardware design and see if I could improve it. I had a few goals in mind, and I wanted to make the board:
- Easier to build, with no soldering required,
- More robust, with better protection against voltage spikes and other issues,
- More modular, so that it could be easily extended with additional features,
- More professional, with a custom PCB design and case,
- More affordable, with a low cost BOM and easy to source components, and
- More accessible, with detailed documentation and support for beginners.
First Pass
I'm not an expert on PCB design, but I have some experience with Kicad, and I have designed a few boards in the past. My first design followed the pattern I've used in previous PCB projects: provide a board with pin sockets on it, so that I could plug in either an ESP32 dev board, or a D1 mini dev board. This would allow me to use either ESP32 or ESP8266 chips, and would allow me to use the same board for both. I did take this board design quite a long way, as can be seen in the Kicad 3D view below:
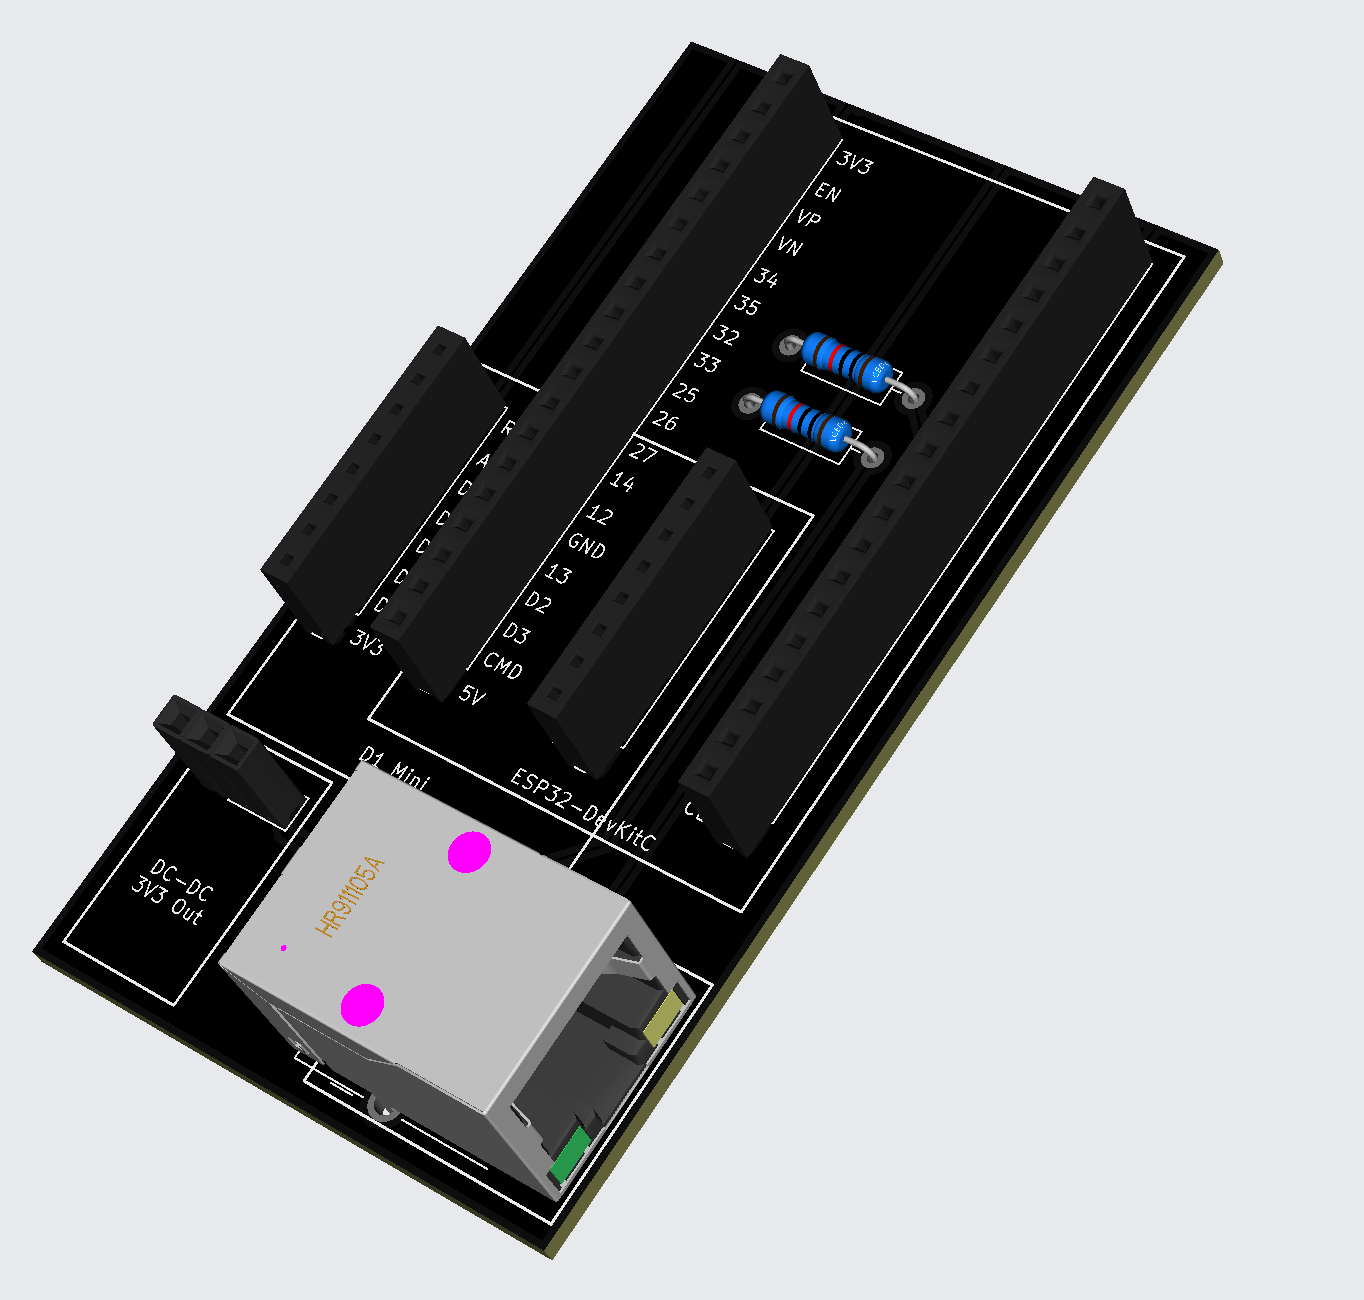
In this approach, people would need to plug in a buck boost converter to convert the +12v from the spa pool controller board down to +3.3v for the ESP32 or ESP8266 chip. I also specified 'through-hole' resistors, as I had no previous experience with surface mounting components, so laziness resulted in those two ugly resistors on the board.
Second Pass
I think as a community of geeks, it was a pretty immediate reaction that whilst the board design would make life easier for people (because it included everything on the PCB), and only needed a person to solder in a voltage converter (for +12v down to +3.3v), it was not the most elegant solution.
Someone in the discord challenged me to design a board with the ESP32 chip on the PCB itself, so that it would not need a separate dev board to be plugged in. This was the most complex PCB I'd ever made. It required me to work through a number of challenges, including:
- Selecting the right ESP32 chip (I settled on an ESP32-S3-mini, mainly because it has built-in USB support),
- Adding a USB-C connector to the board, so that it could be easily programmed and powered when in dev mode,
- Adding a voltage regulator to the board, so that it could be powered from both +12v (from the controller board) and +5v (from USB),
- Adding an RJ-45 connector to the board, so that it could be plugged into the spa pool controller board, and
- Adding all necessary resistors, capacitors, fuses, diodes, and other components to make the board work.
To jump to the end, here is the 3D view of the final board design:
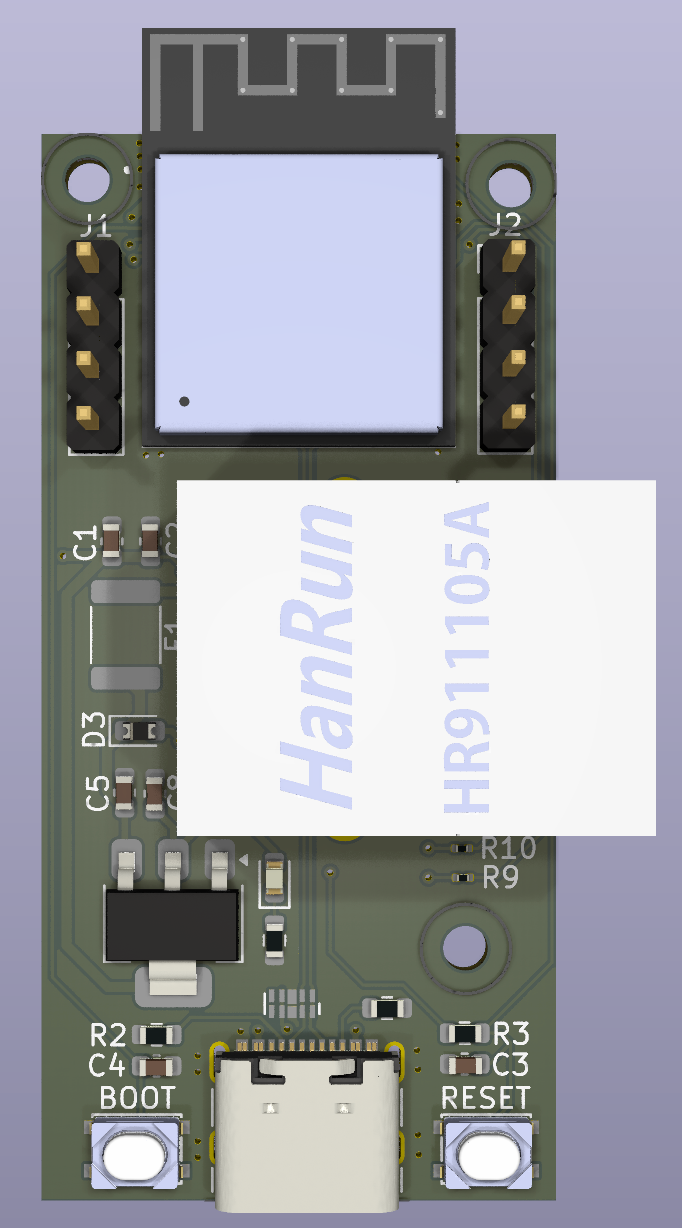
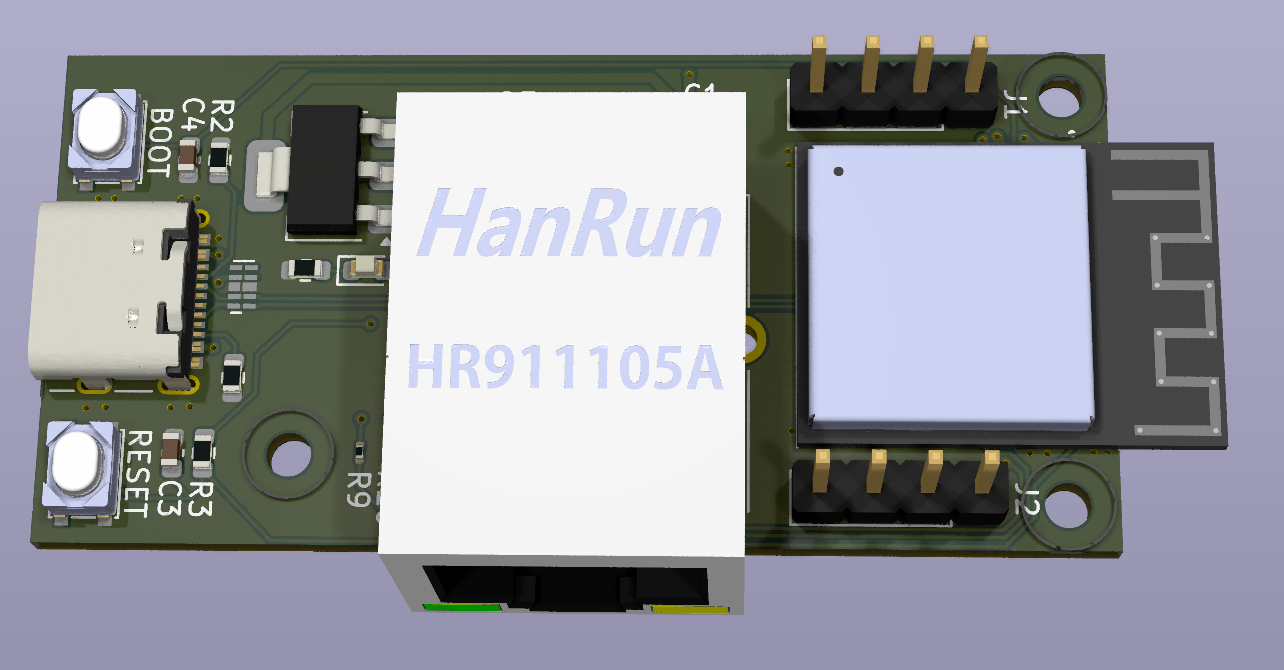
As you can see, it is a much more complex board, but it is also much more elegant. It is a single board that can be plugged into the spa pool controller board, and it has all the necessary components on it to make it work. It is also much more robust, with better protection against voltage spikes and other issues. It meets all of my goals, and I am very happy with it. Having said that, I write this post without having received my PCB boards back from the manufacturer, so I am yet to see if it actually works :-)
I spent a lot of time finding the right components, which were available and cheap. The schematics for my PCB are annotated with links to each of the components on JLCPCB, and this means that when I export the design from KiCad for production with JLCPCB, all of the components are included, and JLCPCB knows where to place each one. This means there will be zero soldering required, and in theory the board should work first time.
The Case
As soon as I demonstrated the PCB, I started getting asked to design a case for it, and I have never done any 3D case design before. When I started searching for how to do this, I quickly came across an amazing solution - a free / open source tool called TurboCase. It is a Python-based command-line tool that converts a KiCad PCB file into an OpenSCAD model, and fortunately KiCad is my PCB design tool of choice.
All TurboCase requires is a few additional annotations to be added into your KiCad PCB design, to designate where there are external connectors, how you want the case lid to be sized, what kind of lid you want, and so on. It can even make places in the bottom of the case to insert screw inserts, so that the PCB can be screwed into the case. To make the whole process easier, in my project I created the following script to generate the case and lid STL files:
#!/bin/bash

mkdir output

# Asking for some configuration values from the user, or use defaults
screw_insert_outer_diameter="3.2"
screw_insert_depth="4.0"

# Prompt the user for input
read -p "What is the outer diameter of the screw inserts you plan to use? (Default is $screw_insert_outer_diameter mm): " user_input
actual_screw_insert_outer_diameter=${user_input:-$screw_insert_outer_diameter}

read -p "What is the depth of the screw inserts you plan to use? (Default is $screw_insert_depth mm): " user_input
actual_screw_insert_depth=${user_input:-$screw_insert_depth}

# Generate SCAD files using turbocase
echo "Step 1 of 3: Generating SCAD file using turbocase..."
turbocase --verbose ../spanet-pcb.kicad_pcb output/case.scad

# Convert the single SCAD file to separate case and lid STL files using OpenSCAD
echo -e "nnConverting SCAD file to STL files..."
echo "Step 2 of 3: Generating Case STL"
openscad -D render="case" -D insert_M2_5_diameter=$actual_screw_insert_outer_diameter -D insert_M2_5_depth=$actual_screw_insert_depth -o output/case.stl output/case.scad

echo -e "nnStep 3 of 3: Generating Lid STL"
openscad -D render="lid" -D insert_M2_5_diameter=$actual_screw_insert_outer_diameter -D insert_M2_5_depth=$actual_screw_insert_depth -o output/lid.stl output/case.scad

echo -e "nnSuccess! SCAD files have been converted to STL files. Review the '/case/output' directory for the generated files."
As you can see, I prompt for the size of the screw inserts, and then run a few commands with TurboCase and OpenSCAD command line tools, and presto - STL files for the case and lid are generated. Here are a few pictures of the case design as of when I wrote this post:
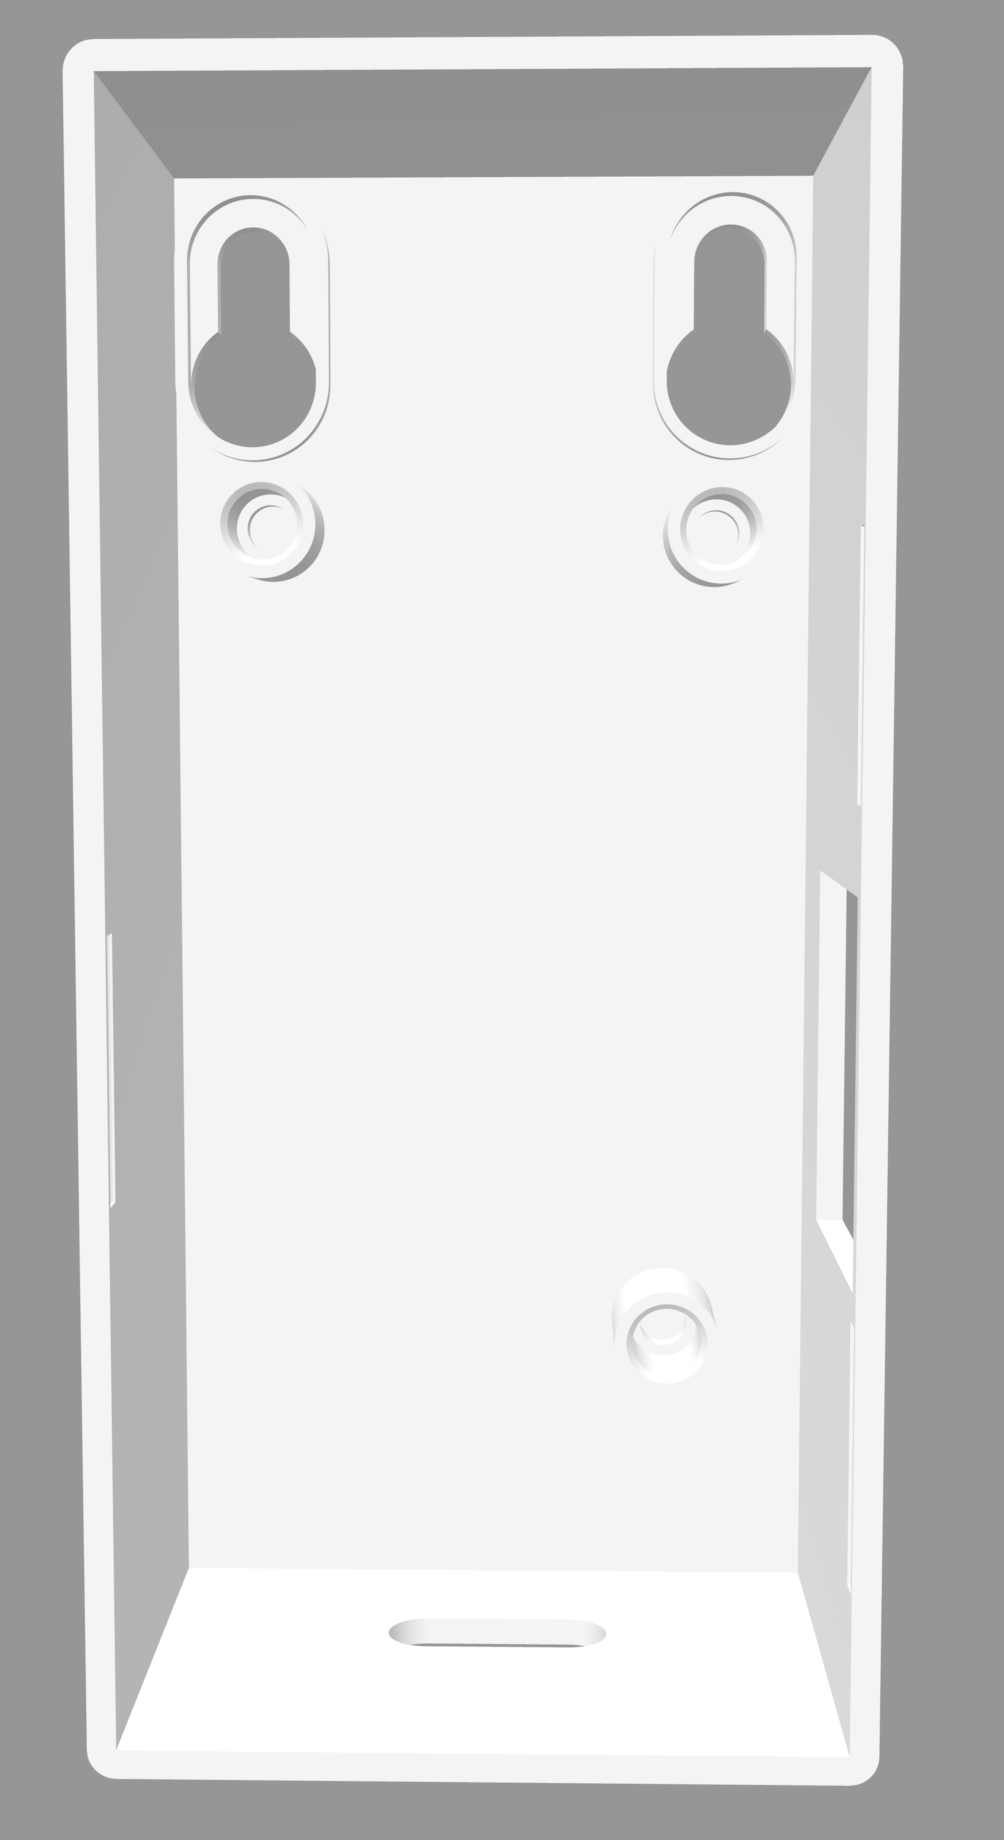
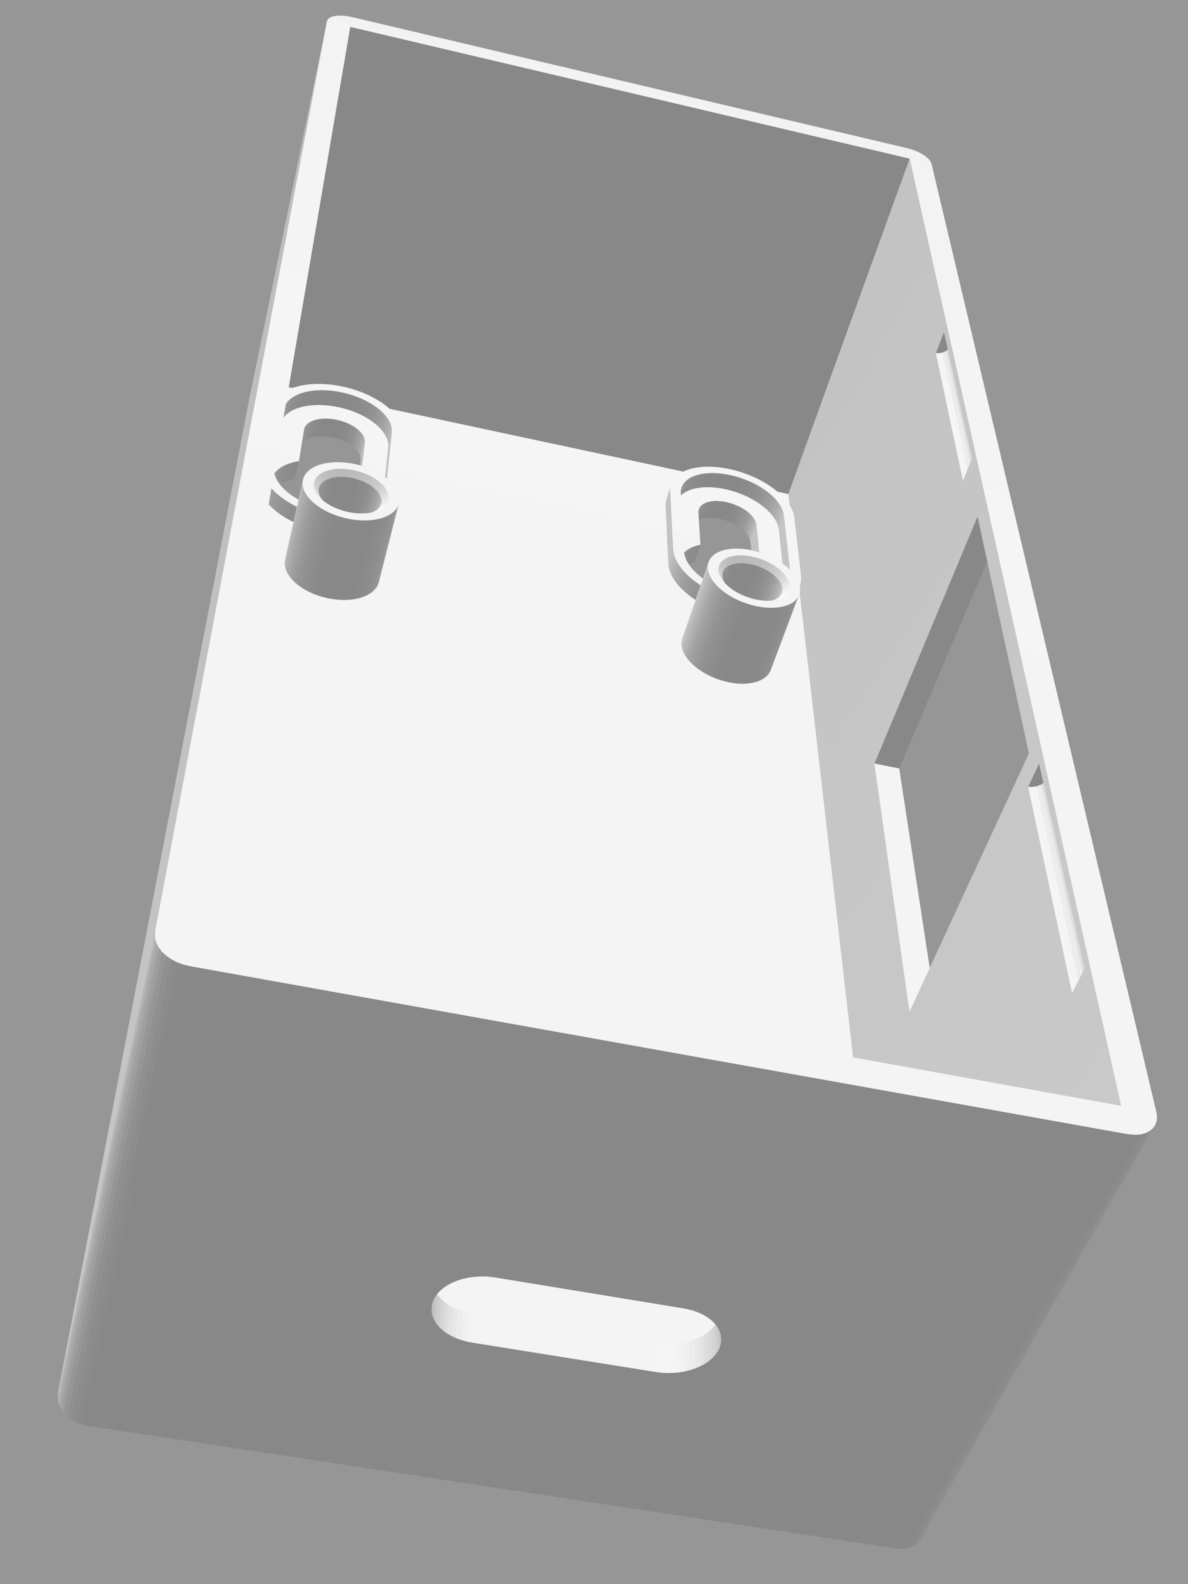

The nice thing about this approach is that whenever I change the PCB design, I can rerun the script to have an updated case design ready to go.
Next Steps
With the PCB and case design complete, I am now about to send an order off to JLCPCB. As I mentioned, the board is annotated with everything required to build the PCB. JLCPCB will also 3D print the case and lid design for me, and I will have a complete solution that I can plug into my spa pool controller board for minimal cost. There are others in the community who will happily test this solution out also, but before I let them loose on that, I plan to create a simple test rig here at home, with a cat5 cable and a 12v power supply, to ensure that the board works as expected when plugged into the spa pool controller board.
This was a fun project, and I wanted to capture this here in case others are interested in doing something similar. I will update this post with the results of the testing, and any further refinements I make to the design. I hope this post has been helpful to you, and I look forward to sharing more about this project in the future.
Thoughts on “Custom PCBs and 3D Printed Cases, with Kicad, TurboCase, and OpenSCAD”